Packer - setup with WinRM
Aim: Use HashiCorp’s Packer and WinRM to automatically create a directory as an example. When that works, we’re ready for [[Packer - setup local dev environment on Windows using Packer]]
Prerequisites:
Winrmhas been setup.Winrmis to Windows whatsshis to Linux. Just as Packer usessshto remotely manage Linux machines, so does Packer usewinrmto remotely manage Windows machines. To set upwinrm, follow the TIL, WinRM - setup and test on Windows laptop- You’ve downloaded Packer. See https://www.packer.io/downloads
At the end of this TIL, we’ll use these steps:
- Setup winrm
- Validate and run the packer template file that echos something on the console and copies a file to another directory.
- Cleanup winrm
Relevant Packer concepts
For connecting to the remote machine, we need to understand the two concepts of “communicator”, how it relates to the “builders”, to “winrm”, and to the remote machine (in this case, my laptop).
I’m running Packer on my laptop and telling it to install tools on the same machine. Because of this, I don’t need builders[[Builders are responsible for creating machines and generating images from them for various platforms. For example, there are separate builders for EC2, VMware, VirtualBox, etc. Packer comes with many builders.
—Packer builder docs::lsn]] that will create other types of machines. So, I’m using the “null” builder, which doesn’t generate any machine images.
When it comes to relation between builders and communicators[[Communicators are used to establish a connection for provisioning a remote machine (such as an AWS instance or local virtual machine).
—Packer communicator docs::rsn]], there’s a one-to-one association.
Visually, the relation looks like this:
When we add the winrm communicator that we configured in the TIL, [[WinRM - setup and test on Windows laptop]], it would look like this:
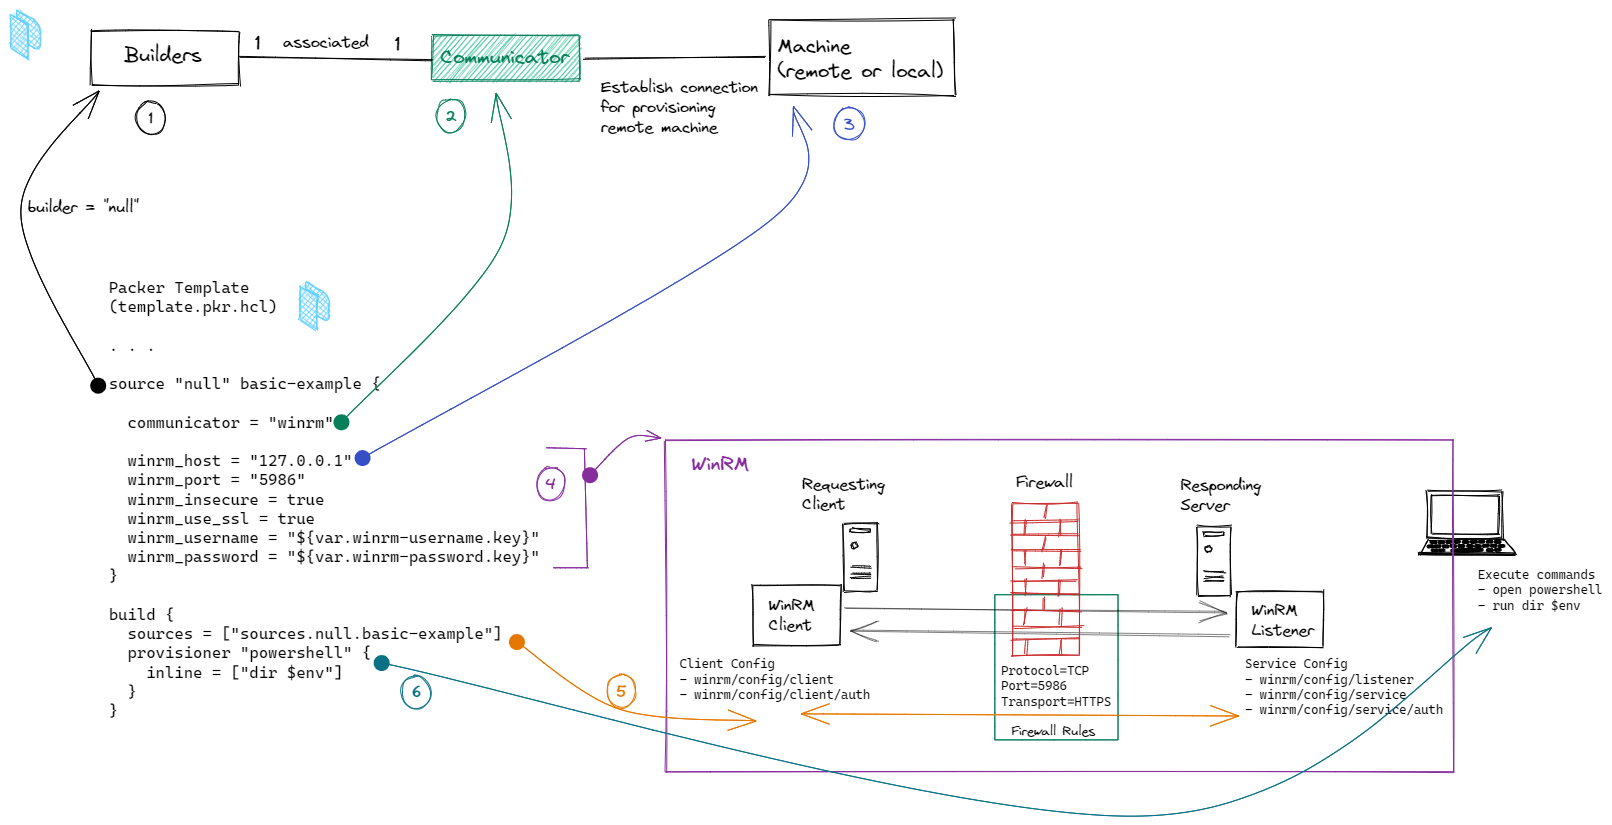
How the Packer template file relates to the other components is as follows:
- In the packer template, declare what “builder” to use. In this case,
null - Declare what “communicator” to use. In this case
winrm. - Declare where to find the remote machine. In this case, the localhost IP address
- Declare details required connect via WinRM to the localhost. Details of the “WinRM” box are covered in another TIL, [[WinRM - setup and test on Windows laptop]]
- Packer establishes a network connection to the remote machine via
winrm. - Packer sends instructions that are executed on the remote machine. In our case, it’s still the same localhost.
Packer template file
The template file, named template.pkr.hcl, is as follows (ignore the red markings):
1
2
3
4
5
6
7
8
9
10
11
12
13
14
15
16
17
18
19
20
21
22
23
24
25
26
27
28
29
30
31
32
33
34
35
36
37
38
39
40
41
42
43
variable "winrm-username" {
  sensitive = true
  default = {
    key = "juliusg"
  }
}

variable "winrm-password" {
  sensitive = true
  default = {
    key = "SECR3TP4SSW0RD"
  }
}

variable "image_folder" {
  type = string
  default = "C:\\tmp\\vm-image\\"
}

source "null" basic-example {
  communicator = "winrm"
  winrm_host = "127.0.0.1"
  winrm_port = "5986"
  winrm_insecure = true
  winrm_use_ssl = true
  winrm_username = "${var.winrm-username.key}"
  winrm_password = "${var.winrm-password.key}"
}

build {
  sources = ["sources.null.basic-example"]

  provisioner "powershell" {
    inline = ["dir $env"]
  }
  provisioner "powershell" {
    inline = ["New-Item -Path ${var.image_folder} -ItemType Directory -Force"]
  }
  provisioner "file" {
    destination = "${var.image_folder}"
    source = "hello.txt"
  }
}
Run Packer
I use this workflow to run the Packer template:
- Setup winrm
- Save that Packer template file somewhere, say
C:\tmp\packer-test - Open PowerShell console and navigate to that directory. And add file
hello.txt - Syntanctially validate the Packer file with
C:\opt\Packer\packer_1.8.2\packer.exe validate -syntax-only template.pkr.hcl - Semantically validate the packer template with
C:\opt\Packer\packer_1.8.2\packer.exe validate template.pkr.hcl - Build Packer template with
C:\opt\Packer\packer_1.8.2\packer.exe build template.pkr.hcl - Packer should take about 15 to 25 seconds to finish.
- Verify that
hello.txtwas copied toC:\tmp\vm-image\ - Cleanup winrm

