WinRM - setup and test on Windows laptop
WinRM is to Windows what SSH is to Linux.
Aim: setup and test winrmon Windows 10 dev laptop.
Why? I’d like to automate setting up my development tools with Packer. See TIL, Packer - setup local dev environment on Windows using Packer.
- Packer uses
winrmto communicate with with remote windows-based machines. winrmis Microsoft’s recommended way to remotely connect to, and manage, Windows machines.
By the end of this TIL, we’ll have
- a PowerShell script that sets up and configures
winrm - manually connecting to local machine using
winrm - another PowerShell script that cleans up what we had setup
Prerequisites:
- able to run the PowerShell console as Administrator.
Ensure the
winrmhas started:- Start PowerShell console as Admin
- check if
winrmservice is running withwinrm e winrm/config/listenerorPS> Get-ChildItem WSMan:\localhost\Listener - if you get errors, start and configure firewall for
winrmservice withwinrm quickconfigand answerywhen prompted.
Relevant WinRM components
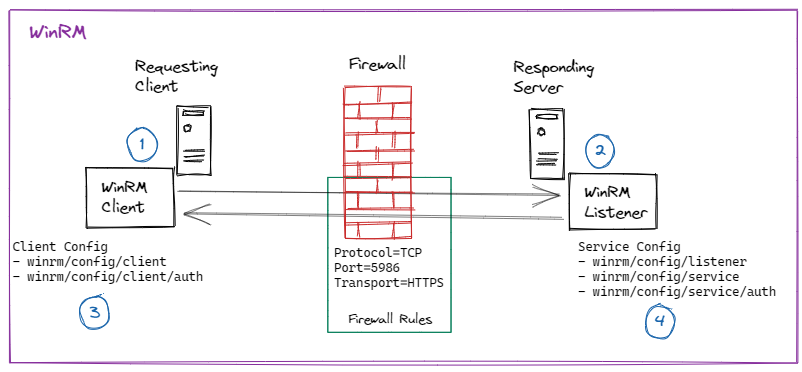
WinRM is to Windows what ssh is to Linux. I’ve simplified its official Client-Server architecture diagram leaving what’s relevant for the setup on one machine, such as my laptop.
- The client talks to the server and the server responds. “server” refers to the “service”
- The server has the
listener, i.e., where thelisteneris, there’s the server. - When running powershell console as Administrator, we can see the client configuration using
winrm get winrm/config/client - When running powershell console as Administrator, we can see the service configuration using
winrm get winrm/config/serviceand that of the listener usingwinrm get winrm/config/listener
Setup WinRM
Even though I started this to get Packer to work, Packer’s guide left much to be desired:
- I’m not creating an additional user just for integrating with Packer.
- Using the self-generated certificate with
packeras DnsName didn’t work. This becomes important when manually connecting to localhost via WinRM. netsh advfirewallis an old command.
The best guide I’ve found so far is https://woshub.com/powershell-remoting-over-https. Complement it with the Microsoft docs.
That I’ve used. The script, https://github.com/juliusgb/utils/blob/main/powershell/SetupWinRM.ps1, does the following:
- Enable PowerShell remoting.
- Generate a self-signed SSL certificate using the computer’s name (
$env:COMPUTERNAME) as hostname and save it the local (client) truststore. - Create WinRM SSL listener and bind the self-signed SSL certificate to it.
- Create a Windows Firewall rule that allows WinRM HTTPS traffic.
- Make WinRM client connections accept unencrypted traffic. Since it’s my laptop, I can take the risk.
- Export the self-signed SSL certificate as a
.cerfile - Import the self-signed SSL certificate into the root (server) truststore.
Manually check certificates
check that the self-signed SSL certificate was saved in local (client) truststore.
- on start, search Certificate -> click on pop up.
- top level certificate icon should show “Certificate - Local Computer”
- click Own Certificates -> Certificates -> One should be in there
- Select it and check that the
Issued bymatches the computer name.
check that self-signed SSL certificate was imported in root truststore.
- on start, type regedit -> click on pop up.
- navigate to HKEY_LOCAL_MACHINE\Software\Microsoft\SystemCertificates\ROOT\Certificates
- look for the directory that matches the certificate thumnprint.
- To find the Certificates’ thumbprint, run in PowerShell
Get-ChildItem -Path 'Cert:\LocalMachineKey\My' | Where-Object Issuer -eq "CN=$env:COMPUTERNAME"
Manually connect to localhost using WinRM
Open another PowerShell console and run the following: Remember to substitute juliusg with your details
1
2
PS> $SessionOption = New-PSSessionOption -SkipCNCheck
PS> Enter-PSSession -Computername $env:COMPUTERNAME -UseSSL -Credential juliusg -SessionOption $SessionOption
A pop-up appears, asking for your credentials. Afterwards, the PowerShell console looks like this:
1
[LAPTOP-Name]: PS: C:\Users\juliusg\Documents>
Type exit to quit the WinRM connection to the local machine.
Cleanup
The cleanup script, https://github.com/juliusgb/utils/blob/main/powershell/CleanupWinRMSetup.ps1, does the following:
- Removes the self-signed SSL certificate from local truststore.
- Removes WinRM HTTPS firewall rule.
- Restores default settings: WinRM client configurations don’t allow unencrypted connections.
- Removes the self-signed SSL certificate from root (server’s) truststore.
- Deletes imported certificate
.cerfile from theC:\tmp\winrm-prepdirectory.
